Is Your Control Module Really Faulty?

Diagnose first
When it comes to automotive repair, diagnosis is a critical step for customer protection. The ability to correctly diagnose a problem the first time is invaluable. Dealing with modules is not a strong suit for most people trying to repair a vehicle. All too often is the module blamed for the fault only to not resolve the issue. This makes the technician look bad in addition to wasting time and money. Use these tips to determine if your module is truly faulty.
Powers and grounds
For a module to properly switch power or ground to an output, it must have power and ground inputs. While this may seem like common sense, it is usually overlooked in the process. You must check the circuits at the module using correct probes. When probing terminals, the probe MUST NOT be larger than the terminal it is normally mated with. A probe too large will spread the terminal and prevent a secure connection to the module. Avoid this at all costs as the terminal could require replacement and create a hidden problem that was not there prior. Next, correctly load test each power and ground circuit to verify its ability to carry current. Larger modules use multiple powers and grounds so use schematics to ensure all circuits are accounted for.
Communications
In the event of a loss of communication or dead module behavior, the data circuits must be checked as well. These circuits vary widely from manufacturer and age, but the same probing requirements remain. High speed CAN circuits are normally arranged in a bus loop between two terminations, meaning 120 ohms on each side with modules between them. The resulting resistance of the loop is around 60 ohms in a complete circuit. You must ensure the loop measures correctly and does not have any connection to ground or power, essentially a floating ring. If all other modules are communicating correctly, chances are the bus is okay.
The module
You determined that powers, grounds, and communication circuits are all good. If the concern lies in a certain component, you should have already verified those circuits and terminals. A dead module with all of these boxes checked off does warrant a module problem. Once you arrive at a module, look at the environment. Check for physical damage or evidence of corrosion. If none is present you probably found the culprit and can move forward with replacement or repair. Modules with signs of water or corrosion should be carefully inspected for the source. If the root cause is not addressed, a repeat failure will occur.
The story behind the picture
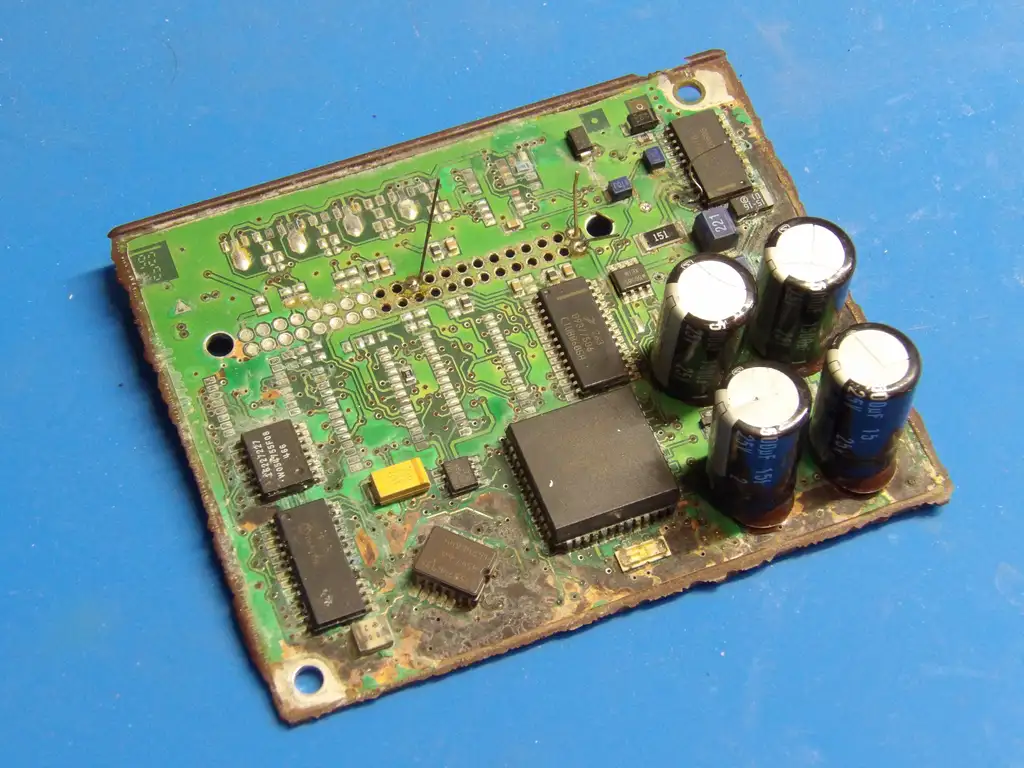
The board shown was an airbag module out of a GM truck or Hummer from the mid 2000s, it presented as an airbag light with no communications. Following the above procedure, the module was replaced and fixed the concern. The root cause was in fact corrosion damage further accelerated by the module being mounted under carpet below the driver’s seat which trapped the moisture. Over time, the moisture worked its way inside and the rest is history.
Why stop there? I made an attempt to revive the module, but it was too far gone. As you can see, heavy corrosion took a toll on the board. Some parts were completely dissolved into powder and a large amount of traces were separated from vias (a connection from one layer to another). Damage this extensive is extremely difficult to repair, in this case it was not worth the time spent even if it was just for fun.
Need Help With an Auto Electronics Issue?
Tell us what failed, the vehicle details, and what you have already checked so we can scope the repair.
Start Auto Intake